
NeddySeagoon,
I didn't realize the Portage tree was already available in squashfs form - that's helpful to know, as I the version I distribute isn't modified from that much (just some additional signed hash verification, which is redundant now gemato has gone live - all the other customizations are done via overlay).
antonlacon,
thanks for the scripts, I'll take a look.
Bootable 64-bit RPi3 Gentoo image (OpenRC/Xfce/VC4) UPDATED
Message
Where are PYTHON TARGETS are stored in?
Now my system (probably after casually made config update by emerge) require python 3.6 install. This, itself, cause massive reinstallation of installed packages to enable python 3.6 use flag, so I afraid of genup which will run --newuse.
So, how to roll back python targets to 2.7 and 3.5 only? Gentoo wiki refers to files, that does not exists in this setup..
- NeddySeagoon
- Administrator

- Posts: 56078
- Joined: Sat Jul 05, 2003 9:37 am
- Location: 56N 3W

orion777,
PYTHON_TARGETS is a use expand and can be set in make.conf
That's an example, which I had commented out in my make.conf.
Only use these settings to delay the inevitable. You will have to do the upgrade sometime.
Doesn't genup install binaries?
PYTHON_TARGETS is a use expand and can be set in make.conf
Code: Select all
PYTHON_TARGETS="python2_7 python3_6"
PYTHON_SINGLE_TARGET="python3_4"Only use these settings to delay the inevitable. You will have to do the upgrade sometime.
Doesn't genup install binaries?
Regards,
NeddySeagoon
Computer users fall into two groups:-
those that do backups
those that have never had a hard drive fail.
NeddySeagoon
Computer users fall into two groups:-
those that do backups
those that have never had a hard drive fail.
orion777,
on the gentoo-on-rpi3-64bit image, PYTHON_TARGETS (and PYTHON_SINGLE_TARGET) is usually controlled by the "base" parent profile, via /usr/portage/profiles/base/make.defaults. As this news article states:(You can check this via emerge --info) This overlap with 3.5 was done to prevent issues during the cutover to 3.6; it will be removed in a little while.
On the image, a gated copy of the Portage tree is used. What happens during the weekly update cycle is that my RPi3 buildserver updates its copy of the Portage tree (using webrsync-gpg) from upstream, and then attempts a full genup run (which builds any upgraded packages, and rebuilds packages with changed USE flags etc - the genup manpage is available here). As the server runs with buildpkg set in FEATURES, successfully built packages automatically create a matching (local) binary package. If there are any issues, I add custom USE flags / package.mask entries etc. into the custom profile, until the build goes through OK. I then test any newly upgraded major packages (GIMP etc.) to check nothing major appears broken. If good, the binary packages are rsync'd up to the binhost (https://isshoni.org/pi64pie, in this case), the Portage tree snapshot is signed (using porthash) and also rsync'd to the isshoni server, and any commits to the custom profile (new masks etc) are pushed to GitHub.
When you run genup on your copy of the image, it will update the rpi3-overlay (which will pull in any custom masks etc. from GitHub) and also the 'gated' copy of the Portage tree. It will then attempt to run a full @world update, and, since the image has getbinpkg set in FEATURES, will check the https://isshoni.org/pi64pie binhost for binary packages (with matching USE flags etc.) before building locally.
As such, NeddySeagoon is correct, in that when you hit a major USE flag change (such as the move to python3_6), appropriately built (or rebuilt) binary packages should already be available on the binhost, so the upgrade should not be painful. Of course, if you have a lot of local USE flag changes, or custom-installed packages, you may still have some local compilation work to do.
I discuss the weekly gated tree, custom profile etc. in more detail here.
on the gentoo-on-rpi3-64bit image, PYTHON_TARGETS (and PYTHON_SINGLE_TARGET) is usually controlled by the "base" parent profile, via /usr/portage/profiles/base/make.defaults. As this news article states:
However, I have temporarily overridden PYTHON_TARGETS in the custom profile used by the image (you can see the edit in the file /usr/local/portage/rpi3/profiles/targets/rpi3/make.defaults on your system; this custom profile inherits inter alia from the base profile). This means that currently, you will have:On 2018-06-22, Python 3.6 will replace Python 3.5 in the default Python
targets for Gentoo systems. The new default targets will be:
PYTHON_TARGETS="python2_7 python3_6"
PYTHON_SINGLE_TARGET="python3_6"
Code: Select all
PYTHON_TARGETS="python2_7 python3_5 python3_6"
PYTHON_SINGLE_TARGET="python3_6"On the image, a gated copy of the Portage tree is used. What happens during the weekly update cycle is that my RPi3 buildserver updates its copy of the Portage tree (using webrsync-gpg) from upstream, and then attempts a full genup run (which builds any upgraded packages, and rebuilds packages with changed USE flags etc - the genup manpage is available here). As the server runs with buildpkg set in FEATURES, successfully built packages automatically create a matching (local) binary package. If there are any issues, I add custom USE flags / package.mask entries etc. into the custom profile, until the build goes through OK. I then test any newly upgraded major packages (GIMP etc.) to check nothing major appears broken. If good, the binary packages are rsync'd up to the binhost (https://isshoni.org/pi64pie, in this case), the Portage tree snapshot is signed (using porthash) and also rsync'd to the isshoni server, and any commits to the custom profile (new masks etc) are pushed to GitHub.
When you run genup on your copy of the image, it will update the rpi3-overlay (which will pull in any custom masks etc. from GitHub) and also the 'gated' copy of the Portage tree. It will then attempt to run a full @world update, and, since the image has getbinpkg set in FEATURES, will check the https://isshoni.org/pi64pie binhost for binary packages (with matching USE flags etc.) before building locally.
As such, NeddySeagoon is correct, in that when you hit a major USE flag change (such as the move to python3_6), appropriately built (or rebuilt) binary packages should already be available on the binhost, so the upgrade should not be painful. Of course, if you have a lot of local USE flag changes, or custom-installed packages, you may still have some local compilation work to do.
I discuss the weekly gated tree, custom profile etc. in more detail here.
Regards,
sakaki
sakaki
Thank you!
However, maybe something is wrong in my 34 days old system, but emerge --sync returns:
First time it was called by genup, next it was called manually.
However, maybe something is wrong in my 34 days old system, but emerge --sync returns:
Code: Select all
=== Sync completed for gentoo
q: Updating ebuild cache for /usr/portage ...
q: Finished 35575 entries in 0.850039 seconds
Checking master signature on gentoo repo...
porthash: Using public key 09F2FF455D90CAF4
porthash: Entering /usr/portage...
porthash: Verifying existing hashfile...
porthash: Hashfile signature and format valid
porthash: Computing master hash of /usr/portage, may take some time...
porthash: error: Hashfile and computed hashes DIFFER
Killing parent process...
orion777,
it's my own repository check (porthash, which I rolled out before gemato was fully deployed) causing that error message. Could you please post the output of "porthash --version" and the contents of /usr/portage/repo.hash on your system (if you have a modern copy of porthash, it may have renamed this automatically to /usr/portage/local/repo.hash, to avoid clashing with gemato's checksums, so you may need to look there instead)? Thanks.
it's my own repository check (porthash, which I rolled out before gemato was fully deployed) causing that error message. Could you please post the output of "porthash --version" and the contents of /usr/portage/repo.hash on your system (if you have a modern copy of porthash, it may have renamed this automatically to /usr/portage/local/repo.hash, to avoid clashing with gemato's checksums, so you may need to look there instead)? Thanks.
Regards,
sakaki
sakaki
I had the same problem on multiple Gentoo systems, not just this one.Sakaki wrote:orion777,
it's my own repository check (porthash, which I rolled out before gemato was fully deployed) causing that error message. Could you please post the output of "porthash --version" and the contents of /usr/portage/repo.hash on your system (if you have a modern copy of porthash, it may have renamed this automatically to /usr/portage/local/repo.hash, to avoid clashing with gemato's checksums, so you may need to look there instead)? Thanks.
https://forums.gentoo.org/viewtopic-t-1 ... 7a608e2ccc
Were your other systems also arm64 using the rpi3-overlay, and/or based on gentoo-on-rpi3-64bit?ericbish wrote: I had the same problem on multiple Gentoo systems, not just this one.
https://forums.gentoo.org/viewtopic-t-1 ... 7a608e2ccc
By default, the porthash repo check is only used (as far as I know) by my gated versions of the Portage tree used with the RPi3 and the Excito B2 and B3 miniservers. If you are seeing it, try deleting /usr/portage/metadata/timestamp.x and then syncing again. You can cat the /usr/portage/repo.hash on your system to see its timestamp also (this may be in /usr/portage/local/repo.hash if you are running a modern version of porthash).
Regards,
sakaki
sakaki
Nope, they were gentoo x86_64 systems, there is a thread with the same thing in the portage forum. There is a bug about it, can't remember the bug ID. I never could figure out exactly what caused it, but clearing /usr/portage and rerunning genup on your arm64 image (or emerge --sync on the x86_64 systems) cleared it up. Cutting the timestamp did not help.Sakaki wrote:Were your other systems also arm64 using the rpi3-overlay, and/or based on gentoo-on-rpi3-64bit?ericbish wrote: I had the same problem on multiple Gentoo systems, not just this one.
https://forums.gentoo.org/viewtopic-t-1 ... 7a608e2ccc
By default, the porthash repo check is only used (as far as I know) by my gated versions of the Portage tree used with the RPi3 and the Excito B2 and B3 miniservers. If you are seeing it, try deleting /usr/portage/metadata/timestamp.x and then syncing again. You can cat the /usr/portage/repo.hash on your system to see its timestamp also (this may be in /usr/portage/local/repo.hash if you are running a modern version of porthash).
That's odd. There only way that porthash gets called, afaik, is via this repo.postsync.d hook, which on the rpi3 is set up by the app-portage/rpi3-check-portage package from my rpi3-overlay. Did you copy your /usr/portage and /etc/portage directories over to an x86_64 machine by any chance, perhaps to use as a 'starter' configuration?ericbish wrote: Nope, they were gentoo x86_64 systems, there is a thread with the same thing in the portage forum. There is a bug about it, can't remember the bug ID. I never could figure out exactly what caused it, but clearing /usr/portage and rerunning genup on your arm64 image (or emerge --sync on the x86_64 systems) cleared it up. Cutting the timestamp did not help.
Regards,
sakaki
sakaki
Sakaki wrote:That's odd. There only way that porthash gets called, afaik, is via this repo.postsync.d hook, which on the rpi3 is set up by the app-portage/rpi3-check-portage package from my rpi3-overlay. Did you copy your /usr/portage and /etc/portage directories over to an x86_64 machine by any chance, perhaps to use as a 'starter' configuration?ericbish wrote: Nope, they were gentoo x86_64 systems, there is a thread with the same thing in the portage forum. There is a bug about it, can't remember the bug ID. I never could figure out exactly what caused it, but clearing /usr/portage and rerunning genup on your arm64 image (or emerge --sync on the x86_64 systems) cleared it up. Cutting the timestamp did not help.
Nope, both those other gentoo boxes were up years before I built the pi. Plus other folks have seen the issue (at least on other on the Pi, and at least a couple of others on x86_64), hence the bug report. It may be two different issues with a common similarity (the manifest failing hash) and just coincidence they came up at the same time......but either way, in both cases, reconstructing the /usr/portage directory and rerunning genup/emerge sync corrected it.
ericbish,
Searching Gentoo bugzilla for porthash doesn't seem to bring up anything - did you by any chance contribute to the original bug report you mentioned? If so would you mind looking up the bug ID so I can investigate this further. Many thanks!
Searching Gentoo bugzilla for porthash doesn't seem to bring up anything - did you by any chance contribute to the original bug report you mentioned? If so would you mind looking up the bug ID so I can investigate this further. Many thanks!
Regards,
sakaki
sakaki
Sakaki wrote:ericbish,
Searching Gentoo bugzilla for porthash doesn't seem to bring up anything - did you by any chance contribute to the original bug report you mentioned? If so would you mind looking up the bug ID so I can investigate this further. Many thanks!
For the life of me, I cannot find it again. I came across it originally IIRC, dumping the error from one of the x86_64 boxes into google, then chasing through a ton of threads regarding the portage sync verification changes and such from a while ago. Then from there, I got sucked into the rabbit hole and somewhere among posts about manifest hash mismatches, there was a bug ID about it. About then I just threw in the towel and blew away portage, and recreated it......problem gone.
Sakaki wrote:orion777,
it's my own repository check (porthash, which I rolled out before gemato was fully deployed) causing that error message. Could you please post the output of "porthash --version" and the contents of /usr/portage/repo.hash on your system (if you have a modern copy of porthash, it may have renamed this automatically to /usr/portage/local/repo.hash, to avoid clashing with gemato's checksums, so you may need to look there instead)? Thanks.
Code: Select all
pi64 /usr/sbin # porthash --version
1.0.6
pi64 /usr/sbin # cat /usr/portage/repo.hash
Hash format: 1
Date: 2018-08-25 17:47
Hash: sha512sum
Metadata covered: no
5cab65371634c7824a5d4ea3685d5d5518b211d70f371ca412d7a7a99261d568d6aa535d09b9a63bc5942ed0022c3a799c61f0b979009c7d75cf4c88c2e165bb  -
pi64 /usr/sbin # cat /usr/portage/local/repo.hash
Hash format: 1
Date: 2018-07-20 12:22
Hash: sha512sum
Metadata covered: no
409c1e0dd2b29b5f7af0929fa64a2970790edb5eb27a52dba5126098f7537d85ccc4a2422147909fe6dc391d9af38ef90bea2570d905ea131b84d5bf7698ff8a  -
orion777, ericbish (and all users of the gentoo-on-rpi3-64bit image) -
OK, first of all, an apology - there is a bug (introduced by me) in porthash-1.0.6, that in turn is causing genup to fail. I've put a fix into porthash-1.0.7, and posted a news article via the rpi3-overlay, and a GitHub issue with the resolution, also copied below. ><
Diagnostics
Look near the end of your /var/log/latest-genup-run.log file to see if the issue affects you; if it does, you'll see something similar to the below:
Fixing the Issue
To address the issue, open a terminal and issue the following commands, as the root user, on your rpi3:
(if running as demouser, prefix the following commands with sudo):
This should upgrade porthash to >= 1.0.7. Once this is done, your automatic weekly genup run should start working again.
That's it!
Background to the Issue (Optional Reading)
The porthash utility creates, or by default checks, the validity of a repository master hash (repo.hash) and counterpart digital signature (repo.hash.asc), to allow verification of a Portage tree distributed over an unauthenticated channel such as rsync. There was no such 'official' facility in Gentoo when the tool was originally deployed.
However, when Gentoo started rolling out its official app-portage/gemato manifest verification tool, porthash was modified (at v1.0.6) to migrate the location of the repo.hash{,.asc} files, from the top level /usr/portage/ directory (where they would clash with gemato) to /usr/portage/local/, which gemato ignores.
Unfortunately, during an rsync process of the Portage tree with the isshoni.org binhost, this local directory is not synced by default, but since (due to faulty logic; my bad) porthash-1.0.6 checks this location first when looking for the repo.hash{,.asc} files, the next time the tree is synced after the files have been migrated, the old (stale) /usr/portage/local/repo.hash{,.asc} files will be checked (not the fresh /usr/portage/repo.hash{,.asc} versions), and accordingly the signature verification will fail, and genup will halt with an error. (orion777 - you can see the date difference in the two repo.hash files you posted)
This error is addressed in >=porthash-1.0.7, so upgrading this single package is sufficient to fix the problem.
Thanks both for reporting this issue, and apologies again to all users for any inconvenience caused
OK, first of all, an apology - there is a bug (introduced by me) in porthash-1.0.6, that in turn is causing genup to fail. I've put a fix into porthash-1.0.7, and posted a news article via the rpi3-overlay, and a GitHub issue with the resolution, also copied below. ><
Diagnostics
Look near the end of your /var/log/latest-genup-run.log file to see if the issue affects you; if it does, you'll see something similar to the below:
Code: Select all
=== Sync completed for gentoo
q: Updating ebuild cache for /usr/portage ...
q: Finished xxx entries in yyy seconds
Checking master signature on gentoo repo...
porthash: Using public key 09F2FF455D90CAF4
porthash: Entering /usr/portage...
porthash: Verifying existing hashfile...
porthash: Hashfile signature and format valid
porthash: Computing master hash of /usr/portage, may take some time...
porthash: error: Hashfile and computed hashes DIFFER
Killing parent process... To address the issue, open a terminal and issue the following commands, as the root user, on your rpi3:
(if running as demouser, prefix the following commands with sudo):
Code: Select all
pi64 ~ # emaint sync --repo sakaki-tools
pi64 ~ # emerge --update --oneshot --verbose app-portage/porthashThat's it!
Background to the Issue (Optional Reading)
The porthash utility creates, or by default checks, the validity of a repository master hash (repo.hash) and counterpart digital signature (repo.hash.asc), to allow verification of a Portage tree distributed over an unauthenticated channel such as rsync. There was no such 'official' facility in Gentoo when the tool was originally deployed.
However, when Gentoo started rolling out its official app-portage/gemato manifest verification tool, porthash was modified (at v1.0.6) to migrate the location of the repo.hash{,.asc} files, from the top level /usr/portage/ directory (where they would clash with gemato) to /usr/portage/local/, which gemato ignores.
Unfortunately, during an rsync process of the Portage tree with the isshoni.org binhost, this local directory is not synced by default, but since (due to faulty logic; my bad) porthash-1.0.6 checks this location first when looking for the repo.hash{,.asc} files, the next time the tree is synced after the files have been migrated, the old (stale) /usr/portage/local/repo.hash{,.asc} files will be checked (not the fresh /usr/portage/repo.hash{,.asc} versions), and accordingly the signature verification will fail, and genup will halt with an error. (orion777 - you can see the date difference in the two repo.hash files you posted)
This error is addressed in >=porthash-1.0.7, so upgrading this single package is sufficient to fix the problem.
Thanks both for reporting this issue, and apologies again to all users for any inconvenience caused
Regards,
sakaki
sakaki
- roylongbottom
- n00b

- Posts: 64
- Joined: Mon Feb 13, 2017 12:32 pm
- Location: Essex, UK
- Contact:
Raspberry Pi 3B+ Stress Tests
Raspberry Pi 3B+ Stress Tests
I have finished running my benchmarks on the Raspberry Pi 3B+. A full report is available from ResearchGate:
https://www.researchgate.net/publicatio ... ationTitle
The last programs run were my Stress Tests that, at least, identify the 3B+ thermal characteristics. These are single core programs with input parameters for duration and test selection, with multiple copies run for maximum loading, and an updated monitor, measuring CPU MHz, temperature and core voltage. The main programs are one running integer arithmetic, another with floating point and My OpenGL program. The first exercise was with the 3B+ card installed in a plastic case, with no heatsink on the CPU.
Following is an example results from my monitoring program, whilst running four copies of the integer stress test program. These are instantaneous samples that can vary up and down within the sampling period. Above 70°C, CPU frequency is reduced from 1.4 GHz to 1.2 GHz, when core voltage is also reduced. Later thermal throttling is applied on reaching 80°C, in this case, occasionally reducing sample MHz to 1087.
Integer Stress Tests
This has 12 tests using different data patterns, 6 of them Write/Read and 6 read only, performance being measured in MB/second. In this case, each test has the same running time, set at 80 seconds (overall 16 minutes), for this test. Below are 32 bit and 64 bit results from the 3B+, where the former is somewhat faster. There were "Cool" and "Hot" runs (room 3 °C to 4°C higher). All show CPU frequency throttling, below 1 GHz with the "Hot" tests, with similar reductions in measured performance.
Floating Point Stress Tests
The program uses single precision floating point calculations, with run time options for the number of operations per data word read/written and data size, in this case, 8 operations per word and 16 KB for L1 cache use. A summary of results is below. This time, the 64 bit version is the faster (up to 17.4 GFLOPS from 4 cores). "Cool" and "Hot" test results are again provided, not particularly comparable with those for the integer tests, but suggesting slightly less performance degradation. All exceeded 70°C but the "Cool" 64 bit test did not suffer from 80°C thermal throttling.
OpenGL Stress Test
My OpenGL benchmark can also be included in stress testing, with a choice of window size, test function and running time. The detailed results PDF report shows that the Tiled Kitchen test produced the highest loading, along with performance being faster, using the 64 bit benchmark. Running a second 15 minute “Hot Test”, the latter, showed rapid varying speed between 20 and 18 FPS, with CPU frequency sometimes reducing to 1200, and maximum temperature of 70.9°C. VMSTAT measurements indicated that more than one CPU core was being used (average utilisation 116%).
OpenGL Extended Power Cable
After noting slow CPU benchmark performance whilst using an extended power cable, the procedure was repeated running the OpenGL test, when performance immediately reduced to 8 FPS, with the following recorded decreases in CPU MHz to 600 and core voltage to 1.2. The Pi 3B+ deserves a commendation for actually running in these circumstances (a permanent way of running cool?).
OpenGL + 3 CPU Stress Tests Gentoo 64 Bit
Further 15 minute tests were carried out, running the OpenGL program at the same time as three CPU tests. Below are summaries of results, comprising a “Hot Test” using the plastic enclosure, with “Cool and Hot” using a FLIRC aluminium case, with the built in efficient CPU heat sink. “Hot” indicates a second run shortly after a “Cool” test.
Using the plastic case, 80°C thermal throttling again occurred, during both integer and floating point tests. Speeds of the latter appeared to be worse than when four copies of the program were run. Perhaps the high OpenGL CPU utilisation involved heavy use of floating point instructions.
With the FLIRC case, the CPU cores were running at 1400 MHz continuously during “Cool” sessions, the 5% per core reduction in performance being typical when running multiprocessor tests. During the “Hot” tests there was no thermal throttling, but there were instances of the 1200 MHz when 70°C was reached (not necessarily noted in instantaneous sample).
I have finished running my benchmarks on the Raspberry Pi 3B+. A full report is available from ResearchGate:
https://www.researchgate.net/publicatio ... ationTitle
The last programs run were my Stress Tests that, at least, identify the 3B+ thermal characteristics. These are single core programs with input parameters for duration and test selection, with multiple copies run for maximum loading, and an updated monitor, measuring CPU MHz, temperature and core voltage. The main programs are one running integer arithmetic, another with floating point and My OpenGL program. The first exercise was with the 3B+ card installed in a plastic case, with no heatsink on the CPU.
Following is an example results from my monitoring program, whilst running four copies of the integer stress test program. These are instantaneous samples that can vary up and down within the sampling period. Above 70°C, CPU frequency is reduced from 1.4 GHz to 1.2 GHz, when core voltage is also reduced. Later thermal throttling is applied on reaching 80°C, in this case, occasionally reducing sample MHz to 1087.
Code: Select all
 Temperature and CPU MHz Measurement  Start at Tue Jul 31 21:14:36 2018

 Seconds
    0.0     1400 scaling MHz,   1400 ARM MHz, core volt=1.3438V, temp=58.0°C
   16.0     1400 scaling MHz,   1400 ARM MHz, core volt=1.3500V, temp=65.0°C
   32.5     1400 scaling MHz,   1400 ARM MHz, core volt=1.3563V, temp=69.3°C
   49.1     1400 scaling MHz,   1200 ARM MHz, core volt=1.3563V, temp=70.4°C
   65.6     1400 scaling MHz,   1199 ARM MHz, core volt=1.2375V, temp=70.9°C
   82.1     1400 scaling MHz,   1200 ARM MHz, core volt=1.2375V, temp=71.4°C
   98.7     1400 scaling MHz,   1200 ARM MHz, core volt=1.2375V, temp=72.0°C
  115.2     1400 scaling MHz,   1200 ARM MHz, core volt=1.2375V, temp=73.1°C
  131.7     1400 scaling MHz,   1200 ARM MHz, core volt=1.2375V, temp=74.1°C
  148.3     1400 scaling MHz,   1200 ARM MHz, core volt=1.2375V, temp=74.1°C
  164.9     1400 scaling MHz,   1200 ARM MHz, core volt=1.2375V, temp=74.7°C
  181.5     1400 scaling MHz,   1200 ARM MHz, core volt=1.2375V, temp=75.2°C
  197.9     1400 scaling MHz,   1200 ARM MHz, core volt=1.2375V, temp=75.2°C
  214.4     1400 scaling MHz,   1200 ARM MHz, core volt=1.2375V, temp=75.2°C
  230.9     1400 scaling MHz,   1200 ARM MHz, core volt=1.2375V, temp=76.3°C
  247.5     1400 scaling MHz,   1200 ARM MHz, core volt=1.2375V, temp=77.4°C
  264.0     1400 scaling MHz,   1200 ARM MHz, core volt=1.2375V, temp=77.4°C
  280.5     1400 scaling MHz,   1200 ARM MHz, core volt=1.2375V, temp=77.4°C
  297.1     1400 scaling MHz,   1200 ARM MHz, core volt=1.2375V, temp=77.4°C
  313.6     1400 scaling MHz,   1200 ARM MHz, core volt=1.2375V, temp=77.4°C
  330.1     1400 scaling MHz,   1200 ARM MHz, core volt=1.2375V, temp=77.4°C
  346.7     1400 scaling MHz,   1200 ARM MHz, core volt=1.2375V, temp=78.4°C
  363.2     1400 scaling MHz,   1200 ARM MHz, core volt=1.2375V, temp=78.4°C
  379.8     1400 scaling MHz,   1200 ARM MHz, core volt=1.2375V, temp=78.4°C
  396.4     1400 scaling MHz,   1200 ARM MHz, core volt=1.2375V, temp=79.5°C
  413.0     1400 scaling MHz,   1200 ARM MHz, core volt=1.2375V, temp=79.5°C
  429.6     1400 scaling MHz,   1200 ARM MHz, core volt=1.2375V, temp=79.5°C
  446.1     1400 scaling MHz,   1200 ARM MHz, core volt=1.2375V, temp=79.5°C
  462.6     1400 scaling MHz,   1200 ARM MHz, core volt=1.2375V, temp=79.5°C
  479.2     1400 scaling MHz,   1195 ARM MHz, core volt=1.2375V, temp=80.1°C
  495.9     1400 scaling MHz,   1200 ARM MHz, core volt=1.2375V, temp=79.5°C
  512.3     1400 scaling MHz,   1200 ARM MHz, core volt=1.2375V, temp=79.5°C
  528.8     1400 scaling MHz,   1200 ARM MHz, core volt=1.2375V, temp=79.5°C
  545.3     1400 scaling MHz,   1200 ARM MHz, core volt=1.2375V, temp=79.5°C
  561.8     1400 scaling MHz,   1200 ARM MHz, core volt=1.2375V, temp=78.4°C
  578.3     1400 scaling MHz,   1200 ARM MHz, core volt=1.2375V, temp=79.0°C
  594.9     1400 scaling MHz,   1200 ARM MHz, core volt=1.2375V, temp=79.5°C
  611.6     1400 scaling MHz,   1195 ARM MHz, core volt=1.2375V, temp=79.5°C
  628.1     1400 scaling MHz,   1195 ARM MHz, core volt=1.2375V, temp=79.5°C
  644.6     1400 scaling MHz,   1200 ARM MHz, core volt=1.2375V, temp=80.6°C
  661.1     1400 scaling MHz,   1200 ARM MHz, core volt=1.2375V, temp=80.6°C
  677.6     1400 scaling MHz,   1141 ARM MHz, core volt=1.2375V, temp=80.1°C
  694.2     1400 scaling MHz,   1194 ARM MHz, core volt=1.2375V, temp=80.6°C
  710.7     1400 scaling MHz,   1141 ARM MHz, core volt=1.2375V, temp=80.6°C
  727.3     1400 scaling MHz,   1195 ARM MHz, core volt=1.2375V, temp=80.6°C
  743.8     1400 scaling MHz,   1141 ARM MHz, core volt=1.2375V, temp=80.6°C
  760.3     1400 scaling MHz,   1087 ARM MHz, core volt=1.2375V, temp=80.1°C
  776.8     1400 scaling MHz,   1141 ARM MHz, core volt=1.2375V, temp=80.6°C
  793.3     1400 scaling MHz,   1141 ARM MHz, core volt=1.2375V, temp=80.6°C
  809.8     1400 scaling MHz,   1141 ARM MHz, core volt=1.2375V, temp=80.6°C
  826.3     1400 scaling MHz,   1141 ARM MHz, core volt=1.2375V, temp=81.1°C
  842.9     1400 scaling MHz,   1087 ARM MHz, core volt=1.2375V, temp=80.6°C
  859.5     1400 scaling MHz,   1141 ARM MHz, core volt=1.2375V, temp=80.6°C
  876.0     1400 scaling MHz,   1087 ARM MHz, core volt=1.2375V, temp=81.1°C
  892.5     1400 scaling MHz,   1141 ARM MHz, core volt=1.2375V, temp=80.6°C
  909.1     1400 scaling MHz,   1140 ARM MHz, core volt=1.2375V, temp=80.6°C
  925.6     1400 scaling MHz,   1087 ARM MHz, core volt=1.2375V, temp=81.1°C
  942.2     1400 scaling MHz,   1141 ARM MHz, core volt=1.2375V, temp=80.6°C
  958.7     1400 scaling MHz,   1141 ARM MHz, core volt=1.2375V, temp=81.1°C
This has 12 tests using different data patterns, 6 of them Write/Read and 6 read only, performance being measured in MB/second. In this case, each test has the same running time, set at 80 seconds (overall 16 minutes), for this test. Below are 32 bit and 64 bit results from the 3B+, where the former is somewhat faster. There were "Cool" and "Hot" runs (room 3 °C to 4°C higher). All show CPU frequency throttling, below 1 GHz with the "Hot" tests, with similar reductions in measured performance.
Code: Select all
           Multiply MB/second by four for overall performance

           Raspbian 32 Bit                     Gentoo 64 Bit
           Cool              Hot               Cool              Hot
           MB/s   MHz    °C  MB/s   MHz    °C  MB/s   MHz    °C  MB/s   MHz    °C

 Write/Read      1400  44.0        1400  59.1        1400  47.8        1399  65.5
        1  3699  1400  68.2  3240  1200  75.2  2927  1400  69.8  2589  1200  78.4
        2  3415  1200  70.9  3297  1200  79.0  2611  1200  70.9  2509  1141  81.1
        3  3218  1200  72.9  3247  1195  80.6  2536  1200  72.0  2375  1087  81.7
        4  3299  1200  73.1  3045  1141  81.1  2525  1200  75.2  2302  1034  81.7
        5  3288  1200  75.2  2929  1087  81.7  2533  1200  75.8  2263  1034  81.7
        6  3291  1200  76.3  2882  1033  81.7  2533  1200  77.4  2231  1034  81.7
 Read
        1  3620  1200  75.8  3343  1141  81.7  2832  1200  77.4  2646  1141  81.7
        2  3602  1200  78.4  3153  1034  81.7  2841  1200  78.4  2539  1034  81.7
        3  3592  1195  79.5  3015   980  82.2  2829  1195  80.1  2470  1034  81.7
        4  3567  1141  80.5  2938   926  82.2  2790  1141  80.6  2444  1033  82.2
        5  3500  1141  80.6  2922   980  82.7  2733  1141  80.6  2414  1034  82.2
        6  3432  1087  80.6  2876   980  82.2  2679  1087  80.1  2152   980  82.2

Average    3460  1197  76.0  3074  1075  81.0  2697  1197  76.5  2411  1066  81.5
1 Core     4065  1400        4065  1400        3168  1400        3168  1400
%Av/1 Core   85    86          76    77	         85    86          76    76

Start                  44.0              59.1              47.8              65.5
Max                    80.6              82.7              80.6              82.2
The program uses single precision floating point calculations, with run time options for the number of operations per data word read/written and data size, in this case, 8 operations per word and 16 KB for L1 cache use. A summary of results is below. This time, the 64 bit version is the faster (up to 17.4 GFLOPS from 4 cores). "Cool" and "Hot" test results are again provided, not particularly comparable with those for the integer tests, but suggesting slightly less performance degradation. All exceeded 70°C but the "Cool" 64 bit test did not suffer from 80°C thermal throttling.
Code: Select all
          Multiply MFLOPS by four for overall performance

          Raspbian 32 Bit                     Gentoo 64 Bit
          Cool              Hot               Cool              Hot
          MFLOPS  MHz    °C MFLOPS  MHz    °C MFLOPS  MHz    °C MFLOPS  MHz    °C

Average    2945  1212  75.7  2833  1168  78.7  3809  1227  71.8  3690  1203  77.4
1 Core     3439  1400        3439  1400        4360  1400        4360  1400
%Av/1 Core   86    87          82    83	         87    88          85    86

Start                  47.8              55.8              45.1              61.2
Max                    80.1              81.7              76.3              80.1
My OpenGL benchmark can also be included in stress testing, with a choice of window size, test function and running time. The detailed results PDF report shows that the Tiled Kitchen test produced the highest loading, along with performance being faster, using the 64 bit benchmark. Running a second 15 minute “Hot Test”, the latter, showed rapid varying speed between 20 and 18 FPS, with CPU frequency sometimes reducing to 1200, and maximum temperature of 70.9°C. VMSTAT measurements indicated that more than one CPU core was being used (average utilisation 116%).
OpenGL Extended Power Cable
After noting slow CPU benchmark performance whilst using an extended power cable, the procedure was repeated running the OpenGL test, when performance immediately reduced to 8 FPS, with the following recorded decreases in CPU MHz to 600 and core voltage to 1.2. The Pi 3B+ deserves a commendation for actually running in these circumstances (a permanent way of running cool?).
Code: Select all
 Seconds
    0.0     1400 scaling MHz,   1400 ARM MHz, core volt=1.2000V, temp=52.6°C
    1.0     1400 scaling MHz,    600 ARM MHz, core volt=1.2000V, temp=52.6°C
    2.4     1400 scaling MHz,    600 ARM MHz, core volt=1.2000V, temp=52.6°C
Further 15 minute tests were carried out, running the OpenGL program at the same time as three CPU tests. Below are summaries of results, comprising a “Hot Test” using the plastic enclosure, with “Cool and Hot” using a FLIRC aluminium case, with the built in efficient CPU heat sink. “Hot” indicates a second run shortly after a “Cool” test.
Using the plastic case, 80°C thermal throttling again occurred, during both integer and floating point tests. Speeds of the latter appeared to be worse than when four copies of the program were run. Perhaps the high OpenGL CPU utilisation involved heavy use of floating point instructions.
With the FLIRC case, the CPU cores were running at 1400 MHz continuously during “Cool” sessions, the 5% per core reduction in performance being typical when running multiprocessor tests. During the “Hot” tests there was no thermal throttling, but there were instances of the 1200 MHz when 70°C was reached (not necessarily noted in instantaneous sample).
Code: Select all
          MB/second and MFLOPS are for each core

          Integer + OpenGL
          Plastic Case            FLIRC Case Cool         FLIRC Case Hot
          MB/sec   MHz  FPS   °C  MB/sec   MHz  FPS   °C  MB/sec   MHz  FPS   °C

Average     2376  1093 14.9  80.0   3025  1400 18.9  59.6   2954  1387 18.4  68.8
1 Core      3168  1400   20         3168  1400   20         3168  1400   20
%Av/1 Core    75    78   74           95   100   95           93    99   92

Start                        55.8                    37.6                    53.7
Max                          82.7                    67.6                    70.4


          Floating Point + OpenGL
          Plastic Case            FLIRC Case Cool         FLIRC Case Hot
          MFLOPS   MHz  FPS   °C  MFLOPS   MHz  FPS   °C  MFLOPS   MHz  FPS   °C

Average     2880  1137 10.5  79.8   4162  1400 18.4  64.4   4096  1393 18.8  66.8
1 Core      4360  1400   20         4360  1400   20         4360  1400   20
%Av/1 Core    66    81   53           95   100   92           94    99   94

Start                        66.1                    46.2                    50.5
Max                          82.2                    69.3                    69.8
Regards
Roy
Roy
roylongbottom,
as always, very interesting results. One question - are the integer stress tests moving 32-bit ints around? If so, do you have a version of the same test that moves 64-bit ints? Unaligned data access (wrt the native word length) would probably impose some performance penalty, as appears to be the case here for 64-bit vs 32-bit mode.
as always, very interesting results. One question - are the integer stress tests moving 32-bit ints around? If so, do you have a version of the same test that moves 64-bit ints? Unaligned data access (wrt the native word length) would probably impose some performance penalty, as appears to be the case here for 64-bit vs 32-bit mode.
Regards,
sakaki
sakaki
- roylongbottom
- n00b
- Posts: 64
- Joined: Mon Feb 13, 2017 12:32 pm
- Location: Essex, UK
- Contact:
I have a 64 bit integer version for Linux/PCs. I will see if it is easily convertible.Sakaki wrote:roylongbottom,
as always, very interesting results. One question - are the integer stress tests moving 32-bit ints around? If so, do you have a version of the same test that moves 64-bit ints? Unaligned data access (wrt the native word length) would probably impose some performance penalty, as appears to be the case here for 64-bit vs 32-bit mode.
Regards
Roy
Roy
- roylongbottom
- n00b
- Posts: 64
- Joined: Mon Feb 13, 2017 12:32 pm
- Location: Essex, UK
- Contact:
Sakaki
I have converted the program that uses 64 bit integers and believe that it measures performance accurately. (It used assembly code for PC versions). It was compiled using gcc 7. I also recompiled the 32 bit integer program and confirmed that results were essentially the same as the original, from gcc 6. Following are results of 5 second tests at KB sizes 16, 64 and 2046 to use L1 cache, L2 cache and RAM.
CPUs use the same registers and equivalent instructions for 64 bit and 32 bit scalar integer arithmetic (confirmed with disassembly) and can execute them at the same speed, where 64 bit MB/second data transfer speed would be double that using 32 bit numbers. This is best demonstrated in read only access using L1 cache based data. As the measurements become more dependent on data transfer speed, 64 bit arithmetic can be at half speed, or same MB/second, as in the read only from RAM example. There are other considerations where writing to memory is involved.
If the programs had complied to use vector instructions, execution speed, using 32 bit numbers, would be twice that with 64 bit data.
I have converted the program that uses 64 bit integers and believe that it measures performance accurately. (It used assembly code for PC versions). It was compiled using gcc 7. I also recompiled the 32 bit integer program and confirmed that results were essentially the same as the original, from gcc 6. Following are results of 5 second tests at KB sizes 16, 64 and 2046 to use L1 cache, L2 cache and RAM.
CPUs use the same registers and equivalent instructions for 64 bit and 32 bit scalar integer arithmetic (confirmed with disassembly) and can execute them at the same speed, where 64 bit MB/second data transfer speed would be double that using 32 bit numbers. This is best demonstrated in read only access using L1 cache based data. As the measurements become more dependent on data transfer speed, 64 bit arithmetic can be at half speed, or same MB/second, as in the read only from RAM example. There are other considerations where writing to memory is involved.
Code: Select all
         Integer Stresss Test Single Core MB/second

                     Write/Read         Read
                     L1    L2   RAM     L1    L2   RAM

 32 Bit Integers   2989  2916  1524   3348  2866  1862
 64 Bit Integers   5706  4635  1094   6650  5323  1945
Regards
Roy
Roy
Hello,
I've just posted a v1.3.0 release of my bootable 64-bit Gentoo image for the RPi3 (model B and B+) on GitHub (here, includes full download instructions).
A changelog from the prior release image (with upgrade instructions) may be viewed here, but in summary:
Have fun ^-^
And, as always, any problems or comments, please post in this thread!
I've just posted a v1.3.0 release of my bootable 64-bit Gentoo image for the RPi3 (model B and B+) on GitHub (here, includes full download instructions).
A changelog from the prior release image (with upgrade instructions) may be viewed here, but in summary:
- Migrated from porthash repository verification to Gentoo's own, official gemato-based approach (with failure quarantine). Accordingly, the porthash USE flag on dev-embedded/rpi3-64bit-meta has switched from default-on to default-off as of v1.3.0, and the weekly-gated rsync URI has changed (to one without polluting porthash signatures), from rsync://isshoni.org/gentoo-portage-pi64 to rsync://isshoni.org/gentoo-portage-pi64-gem. (The older version will continue to be supported for a time, for backwards compatibility during the changeover period.)
- Added support for the transparent-compression write-through zswap cache to bcmrpi3-kernel-bis, and created a startup service (rpi3-zswap) to start using it. Given the highly compressible nature of most RAM pages on a running system, and the RPi3's relatively meagre I/O capabilities, this should materially improve system responsiveness under load. Parameterized via /etc/conf.d/rpi3-zswap.
- Added a startup service (rpi3-expand-swap), to increase the ('real', backing-store-based) swapfile size to 1GiB, space permitting, as a one-off operation post root partition and filesystem resize. Parametrized via /etc/conf.d/rpi3-expand-swap.
- Various minor ebuild tidy-ups.
- All packages brought up-to-date against the Gentoo tree, as of 16 September 2018. Most packages have been rebuilt on gcc-8.2 (which should bring a small performance improvement).
- Kernel upgraded to sys-kernel/bcmrpi3-kernel-bis-bin-4.14.71.20180922, accompanying boot firmware to sys-boot/rpi3-64bit-firmware-1.20180919 (these will of course auto-update as new versions are unmasked).
Have fun ^-^
And, as always, any problems or comments, please post in this thread!
Regards,
sakaki
sakaki
Can someone to test the possibility to install the libbloom? I have this compile error https://forums.gentoo.org/viewtopic-p-8 ... ml#8265864
Hello,
as the current gentoo-on-rpi3-64bit image (for the RPi3 B/B+) has KVM enabled in the kernel, I thought it might be worth briefly covering how to use it to efficiently run another OS as a virtualized QEMU guest.
For the sake of concreteness, I'll show how to start up the following (obviously, you can adapt for your particular interests):
Then, open a terminal, and working as the regular user ('demouser'), issue:
Next, collect the various pieces of software needed to boot the guest. The first is an EFI BIOS. Here, we'll use the latest aarch64 (aka arm64) tianocore image from Linaro. Issue:
The firmware image is 2MiB so shouldn't take long to download.
Note that for simplicity, we'll not set up the ability for persistent EFI variables in this demo (see here for instructions on how to do so).
Next, download the latest Ubuntu 'bionic' (18.04 LTS server) arm64 cloud image. Issue:
You can of course use a different OS or version if you like. The exact size of this image will depend upon what is 'current' when you try it, of course, but at the time of writing it was ~300MiB, so the above download may take a little time, depending on the speed of your network connection.
Note that although the image is already in QEMU QCOW2 format, we won't use it for booting directly, as we may want to start various fresh instances (and the copy we boot will be modified once used, since it encapsulates a writeable root filesystem). Instead, we'll make a copy, using this image as the basis. The gentoo-on-rpi3-64bit image already contains app-emulation/qemu pre-installed, so issue:
to create a derivative 'instance' QCOW2 image (bionic-image-01.img), backed by the 'master' copy you just downloaded. (you can do this as many times as you like).
Now, as is now common with such 'cloud' images (not just from Ubuntu), no 'out of the box' login credentials, hostname etc. are configured. The chicken-and-egg problem this obviously creates is solved through the use of the cloud-init service (pre set-up to run on boot). Inter alia, this will look for configuration data stored in a specially named (viz.: 'cidata') iso9660 filesystem, and if found uses it to set up initial passwords and so forth.
Following these notes, we'll just create a bare-minimum 'NoCloud' data source here. Issue:
If you run "tail -n +1 *-data", you should now see:
These two files (when suitably packaged) will instruct cloud-init to:
Next, to be able to package the config data, we need a utility called mkisofs; this is part of the app-cdr/cdrtools package (covered by virtual/cdrtools), which is not shipped with the gentoo-on-rpi3-64bit image by default, but is available on the binhost. So to install it, issue:
This shouldn't take long to complete. Once done, you can proceed to build the specially named iso9660 image; issue:
Hint: on some distributions (although not Gentoo, yet) mkisofs has been replaced by genisoimage, which has a slightly different invocation syntax.
If you run "ls" in your qemu-test directory, you should now see:
That's the preparation over, we can now boot the image! Make sure your RPi3 isn't too heavily loaded, then run (still as the regular user, in the qemu-test directory):
Most of these options should be self explanatory (see the qemu docs for more details). Note in particular that we:
Shortly thereafter, if all is well, you should be greeted by a login prompt. Log in as user ubuntu, password passw0rd.
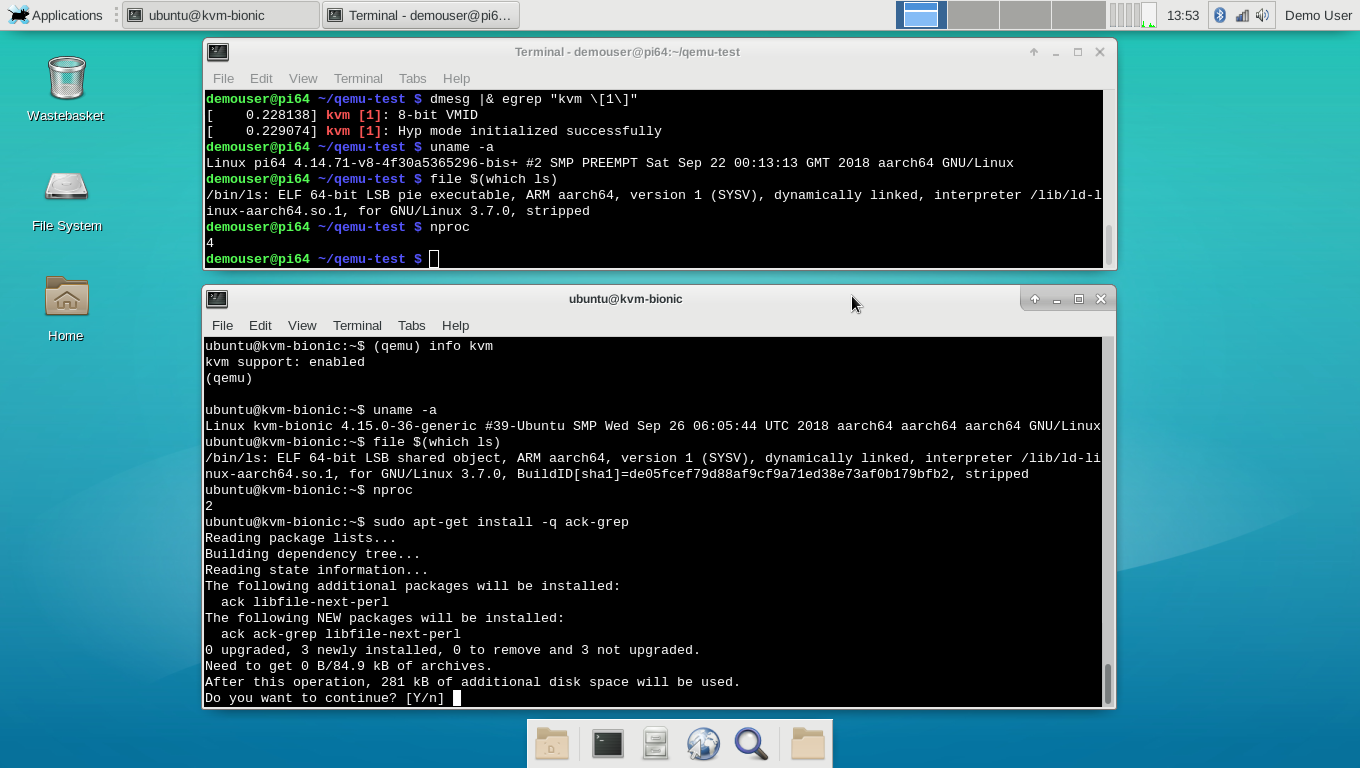
Once in, you can then play around with your Ubuntu system! Here's a screenshot from one of my RPi3B+'s:
https://raw.githubusercontent.com/sakak ... enshot.png
Note how the Gentoo (top console) and Ubuntu (bottom console) instances in the above screenshot are running different kernels - this is not simply a chroot. And also that the system load is very low, due to the efficiency of the kvm virtualization.
One point: with networking set up as here, you can't ping from inside the guest system, but you can wget etc., and so apt-get works. This networking issue can easily be resolved, but this isn't a detailed qemu tutuorial.
On the text console, you can use Ctrl-a then c to switch between the bash prompt and the qemu monitor prompt (e.g. see the top of the lower console window in the above screenshot).
have fun ^-^
PS: the current kernel config may be viewed here, diff against the bcmrpi3_defconfig here.
as the current gentoo-on-rpi3-64bit image (for the RPi3 B/B+) has KVM enabled in the kernel, I thought it might be worth briefly covering how to use it to efficiently run another OS as a virtualized QEMU guest.
For the sake of concreteness, I'll show how to start up the following (obviously, you can adapt for your particular interests):
- hardware: RPi3 (B or B+);
- 'host' OS: >= v1.3.0 of my bootable gentoo-on-rpi3-64bit image;
- 'guest' OS: the latest official 64-bit aarch64 cloud image of Ubuntu Server 18.04 LTS ('bionic beaver') (cloud images are deliberately minimal, so well suited for our needs);
- virtualizer: app-emulation/qemu-3.0.0
- BIOS: tianocore aarch64 EFI;
- cores: 2 out of the 4 available;
- memory: 256 MiB memory allocation (from the RPi3's 1GiB);
- console-only setup, no graphics, SPICE etc. (easy to add if you want);
- pass-through networking enabled (so you can apt-get from the guest, etc.);
- cloud-init 'NoCloud' data source set up, to provide the initial machine name, ubuntu user's password etc.
- running as the regular user ('demouser'), not root.
Then, open a terminal, and working as the regular user ('demouser'), issue:
Code: Select all
demouser@pi64 ~ $ mkdir -p qemu-test && cd qemu-test
Code: Select all
demouser@pi64 ~/qemu-test $ wget -c http://snapshots.linaro.org/components/kernel/leg-virt-tianocore-edk2-upstream/latest/QEMU-AARCH64/RELEASE_CLANG35/QEMU_EFI.fdNote that for simplicity, we'll not set up the ability for persistent EFI variables in this demo (see here for instructions on how to do so).
Next, download the latest Ubuntu 'bionic' (18.04 LTS server) arm64 cloud image. Issue:
Code: Select all
demouser@pi64 ~/qemu-test $ wget -c https://cloud-images.ubuntu.com/bionic/current/bionic-server-cloudimg-arm64.img
Note that although the image is already in QEMU QCOW2 format, we won't use it for booting directly, as we may want to start various fresh instances (and the copy we boot will be modified once used, since it encapsulates a writeable root filesystem). Instead, we'll make a copy, using this image as the basis. The gentoo-on-rpi3-64bit image already contains app-emulation/qemu pre-installed, so issue:
Code: Select all
demouser@pi64 ~/qemu-test $ qemu-img create -f qcow2 -b bionic-server-cloudimg-arm64.img bionic-image-01.img
Now, as is now common with such 'cloud' images (not just from Ubuntu), no 'out of the box' login credentials, hostname etc. are configured. The chicken-and-egg problem this obviously creates is solved through the use of the cloud-init service (pre set-up to run on boot). Inter alia, this will look for configuration data stored in a specially named (viz.: 'cidata') iso9660 filesystem, and if found uses it to set up initial passwords and so forth.
Following these notes, we'll just create a bare-minimum 'NoCloud' data source here. Issue:
Code: Select all
demouser@pi64 ~/qemu-test $ { echo instance-id: kvm-bionic-01; echo local-hostname: kvm-bionic; } > meta-data
demouser@pi64 ~/qemu-test $ printf "#cloud-config\npassword: passw0rd\nchpasswd: { expire: False }\nssh_pwauth: True\n" > user-data
Code: Select all
==> meta-data <==
instance-id: kvm-bionic-01
local-hostname: kvm-bionic

==> user-data <==
#cloud-config
password: passw0rd
chpasswd: { expire: False }
ssh_pwauth: True
- Set up an instance called kvm-bionic--01, with hostname kvm-bionic
- Set the password for the 'ubuntu' (default) user to passw0rd (adapt if desired), ensure it has no expiry, and allow it to be used for login via ssh.
Next, to be able to package the config data, we need a utility called mkisofs; this is part of the app-cdr/cdrtools package (covered by virtual/cdrtools), which is not shipped with the gentoo-on-rpi3-64bit image by default, but is available on the binhost. So to install it, issue:
Code: Select all
demouser@pi64 ~/qemu-test $ sudo emerge --verbose --noreplace virtual/cdrtools
Code: Select all
demouser@pi64 ~/qemu-test $ mkisofs -o seed-kvm-bionic-01.iso -V cidata -J -rock user-data meta-data
If you run "ls" in your qemu-test directory, you should now see:
Code: Select all
QEMU_EFI.fd          bionic-server-cloudimg-arm64.img  seed-kvm-bionic-01.iso
bionic-image-01.img meta-data user-dataCode: Select all
demouser@pi64 ~/qemu-test $ qemu-system-aarch64 -M virt -cpu host \
  -m 256M -smp 2  -nographic \
  -bios QEMU_EFI.fd \
  -cdrom seed-kvm-bionic-01.iso \
  -drive if=none,file=bionic-image-01.img,id=hd0 -device virtio-blk-device,drive=hd0 \
  -device virtio-net-device,netdev=vmnic -netdev user,id=vmnic  \
  -accel kvm 2>/dev/null
- allocate 256MiB of memory and restrict to two processors, no graphics (second line); and
- turn on KVM acceleration (last line) and specify the 'host' cpu type (which requires it; first line).
Shortly thereafter, if all is well, you should be greeted by a login prompt. Log in as user ubuntu, password passw0rd.
Once in, you can then play around with your Ubuntu system! Here's a screenshot from one of my RPi3B+'s:
https://raw.githubusercontent.com/sakak ... enshot.png
Note how the Gentoo (top console) and Ubuntu (bottom console) instances in the above screenshot are running different kernels - this is not simply a chroot. And also that the system load is very low, due to the efficiency of the kvm virtualization.
One point: with networking set up as here, you can't ping from inside the guest system, but you can wget etc., and so apt-get works. This networking issue can easily be resolved, but this isn't a detailed qemu tutuorial.
On the text console, you can use Ctrl-a then c to switch between the bash prompt and the qemu monitor prompt (e.g. see the top of the lower console window in the above screenshot).
have fun ^-^
PS: the current kernel config may be viewed here, diff against the bcmrpi3_defconfig here.
Regards,
sakaki
sakaki
FYI, firefox-63.0.1-r1 is now available on the binhost. This required a bit of tweaking to build with bindist set, but hopefully will work OK. Please let me know if you experience any problems with it.
As before, users on the latest v1.3.0 gentoo-on-rpi3-64bit image just need to run genup (as root, or using sudo) to get the updated browser via binary package - or, if you prefer, simply wait for the system's weekly autoupdate to do this for you.
(If you have a significant amount of work invested in an older release of this image, I have also provided manual upgrade instructions (from 1.0.0 thru 1.2.2 → 1.3.0) here.)
Regards,
sakaki
sakaki
rpi3 display problems
I installed the image to a 16g sd-card.
Boot was successful and wireless keyboard and mouse worked perfectly -- some minutes. Then the monitor complained: "HDMI1 no signal" and all went black!
After reboots it works again some minute. Some time I can use the monitor as a console. But the screen disappears over and over again.
Login via SSH works fine.
The same HDMI-cable and Monitor work perfectly with an old Raspberry.
What is wrong? The sd-card is rather slow, 1 GIB is written in about 60 s. I also suspect hardware error in the rpi3. It is new.
The power supply is "Raspberry" original, so I think power is OK.
I am trying to update the system with "genup". There are some error messages:
When I rerun "genup" it hangs, I think.
I gave up after waiting more than an hour for emerge to complete. /var/log/emerge.log shows nothing:Edit: I see that it is lack of memory. I add a swapfile and rerun over night!
Boot was successful and wireless keyboard and mouse worked perfectly -- some minutes. Then the monitor complained: "HDMI1 no signal" and all went black!
After reboots it works again some minute. Some time I can use the monitor as a console. But the screen disappears over and over again.
Login via SSH works fine.
The same HDMI-cable and Monitor work perfectly with an old Raspberry.
What is wrong? The sd-card is rather slow, 1 GIB is written in about 60 s. I also suspect hardware error in the rpi3. It is new.
The power supply is "Raspberry" original, so I think power is OK.
I am trying to update the system with "genup". There are some error messages:
Code: Select all
...
 * Syncing all portage overlays
/usr/bin/eix-sync: line 396: layman: command not found
 * layman -S failed
 ...
>>> No outdated packages were found on your system.
* Updating @world set (for new versions, or changed use flags)...
Draw call returned Invalid argument.  Expect corruption.
...
Code: Select all
>>> No outdated packages were found on your system.
* Updating @world set (for new versions, or changed use flags)...
top command:
8922 root 39 19 373976 363172 4268 R 100.0 36.6 13:17.39 emergeCode: Select all
1542136327:  *** Finished. Cleaning up...
1542136332:  *** exiting successfully.
1542136332:  *** terminating.
Code: Select all
[16103.027259] SLUB: Unable to allocate memory on node -1, gfp=0x14000c0(GFP_KERNEL)
[16103.027265]   cache: nsproxy, object size: 56, buffer size: 56, default order: 0, min order: 0
[16103.027272]   node 0: slabs: 2175, objs: 158775, free: 0
[16103.027295] kswapd0: page allocation failure: order:0, mode:0x14000c0(GFP_KERNEL), nodemask=(null)
[16103.027310] kswapd0 cpuset=/ mems_allowed=0
[16103.027324] CPU: 0 PID: 45 Comm: kswapd0 Tainted: G      D  C      4.14.71-v8-4f30a5365296-bis+ #2
[16103.027331] Hardware name: Raspberry Pi 3 Model B Plus Rev 1.3 (DT)
[16103.027336] Call trace:
[16103.027346] [<ffffff9be8e8b1e8>] dump_backtrace+0x0/0x268
[16103.027354] [<ffffff9be8e8b474>] show_stack+0x24/0x30
[16103.027361] [<ffffff9be9572ecc>] dump_stack+0xac/0xe8
[16103.027368] [<ffffff9be8fe2ae8>] warn_alloc+0xe0/0x160
[16103.027376] [<ffffff9be8fe3a90>] __alloc_pages_nodemask+0xe90/0xec8
[16103.027383] [<ffffff9be9035e24>] new_slab+0x404/0x578
[16103.027391] [<ffffff9be9038210>] ___slab_alloc.constprop.30+0x2d0/0x368
[16103.027398] [<ffffff9be9038304>] __slab_alloc.isra.24.constprop.29+0x5c/0xa8
[16103.027406] [<ffffff9be9038590>] kmem_cache_alloc+0x240/0x270
[16103.027414] [<ffffff9be9031d9c>] zswap_frontswap_store+0xbc/0x620
[16103.027422] [<ffffff9be90304ec>] __frontswap_store+0x9c/0x170
[16103.027429] [<ffffff9be9029aa0>] swap_writepage+0x68/0xc0
[16103.027437] [<ffffff9be8ff0adc>] pageout.isra.19+0x1a4/0x330
[16103.027444] [<ffffff9be8ff2cec>] shrink_page_list+0x7fc/0xaf8
[16103.027451] [<ffffff9be8ff36e4>] shrink_inactive_list+0x20c/0x5f0
[16103.027459] [<ffffff9be8ff4250>] shrink_node_memcg+0x368/0x640
[16103.027466] [<ffffff9be8ff45ec>] shrink_node+0xc4/0x328
[16103.027473] [<ffffff9be8ff5548>] kswapd+0x2b8/0x7f8
[16103.027481] [<ffffff9be8eee788>] kthread+0x108/0x138
[16103.027488] [<ffffff9be8e85248>] ret_from_fork+0x10/0x18
Last edited by Irre on Tue Nov 13, 2018 10:38 pm, edited 1 time in total.